|
Tools You Will Need
|
|
You, or your licensed mechanic, will need some basic hand tools such as:
| 01. Metric socket set |
05. Zip ties |
| 02. Ratchet |
06. Medium flathead screwdriver |
| 03. Rubber mallet |
07. Pliers |
| 04. Medium Phillips screwdriver |
|
|
|
|
Initial Setup Supplies
|
| 01. Premium gasoline. Most scooters with GY6-style engines recommend 91 octane fuel. |
| 02. Blue thread locker such as Loctite. |
| 03. Spray lubricant. |
| 04. Quality gear oil (GL-3 or GL-5). |
| 05. Quality standard 15W-40 oil. |
Break-In Oil Note
For the break-in period, the original guide recommends NOT using synthetic motor oil. Standard oil is recommended to help with the break-in process. After the initial break-in period, synthetic oil may be used if desired. Always follow the oil specification in your owner's manual.
|
|
|
1. Inspect & Remove the Packaging
|

The large cardboard box and metal crate are designed to protect your scooter during shipping. Carefully inspect the unit before removing the cardboard and look for any obvious signs of shipping damage.
Take photos of anything that appears serious before removing the packaging. The metal crate may be bent because it is designed to absorb impacts and protect the scooter.
Walk around the unit and note how it is attached to the crate. Begin unbolting the unit from the top and work your way down.
Safety Tip: Have two people available when removing the scooter from the crate. Place the scooter on stable ground and use the center stand when appropriate.
|
|
|
2. Prepare the Battery
|
Locate the battery box. It may be located on the step-through area or inside the under-seat storage compartment.
If the supplied battery requires electrolyte, carefully follow the battery manufacturer's instructions. Allow the battery to sit for the recommended period before charging.
Battery Safety
Battery electrolyte can be hazardous. Wear appropriate protective equipment, keep it away from skin and eyes, and follow the manufacturer's safety instructions.
|
|
|
3. Install the Front Wheel
|
|
Most scooters arrive with the front wheel removed. If your front wheel is already installed, continue to the next section.
If your model has a brake-pad spacer, remove it first. Carefully guide the wheel into position and make sure the brake disc slides correctly between the brake pads.
Install the appropriate wheel spacer and speed sensor components according to your specific model. Carefully align the tabs and fork mounting points before sliding the axle through the assembly.
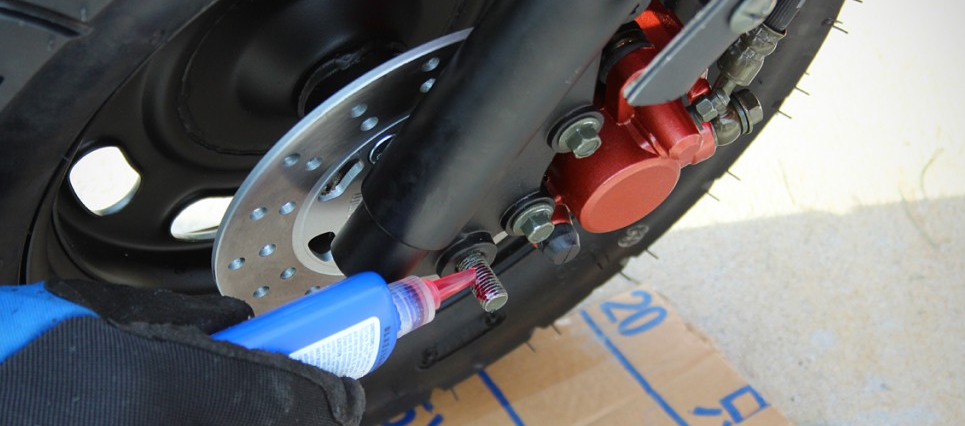
Once the axle is installed, apply a small amount of blue thread locker to the threads if specified, then install the washer and nut. Always use the torque specification provided in your owner's manual.
Important: Do not force the axle or damage the speed sensor. If the wheel or axle does not align correctly, stop and inspect the assembly before continuing.
 |
|
|
4. Complete the Full PDI Check
|
|
Once the front wheel is securely installed, you may inspect the mechanical and electrical components behind the body panels. This step is important, but it may be better performed by a qualified scooter or motorcycle mechanic if you are not comfortable removing bodywork.
Work in a well-lit area and take photos or notes as you remove panels. Keep screws and clips organized with their respective panels so everything can be reinstalled correctly.
CHECK THESE AREAS:
• Frame and welds
• Ground connections
• Electrical connectors
• Wiring harness routing
• Nuts and bolts
• Exhaust mounting hardware
• Fuel and vacuum lines
• Carburetor drain system
• Gas tank interior
• Spark plug and plug wire
Check electrical connectors one at a time. Pull on the connector itself rather than the wires. Secure loose wiring away from hot or moving parts.
Inspect the frame and welds for cracks or significant corrosion. If you discover a structural crack, do not operate the scooter; contact your dealer for assistance.
|
|
|
Carburetor & Fuel System
|
|
Some 150cc and 50cc carburetors use a float-bowl drain tube assembly. Make sure the drain screw and related components are properly installed before attempting to start the scooter.
Also inspect the inside of the fuel tank with a flashlight and make sure it is free from Styrofoam, packaging material or other debris.
Important: A fuel-system problem can leave you stranded or create a safety hazard. If you are unsure about the carburetor or fuel system, have a qualified mechanic inspect it before starting the scooter.
|
|
|
Spark Plug Check
|
|
Check the spark plug and plug gap according to your owner's manual. An NGK plug may be used if it is the correct specification for your scooter.
When reinstalling the plug, carefully start the threads by hand to avoid cross-threading the aluminum cylinder head. Tighten according to the torque specification in your owner's manual.
 |
|
|
Battery Installation
|
|
The battery compartment location varies by scooter model. It may be in the floorboard or underneath the seat.
Install the battery so the positive and negative terminals align with the corresponding cables.
BATTERY CONNECTION
+ Connect the red positive cable to the positive terminal.
− Connect the negative cable to the negative terminal.
Check the fuse holder on the smaller red battery cable and make sure the fuse is intact and properly connected. Reinstall the battery compartment cover and secure all retaining screws.
|
|
|
5. Engine Oil
|
Initial Oil Change
The original guide recommends changing the shipping oil before operating the scooter and using appropriate non-synthetic oil during the initial break-in period. Always verify the correct oil type and capacity in your owner's manual.
Warm the engine slightly before draining the oil, while taking care around hot engine components and oil. Place an appropriate drain container beneath the oil drain plug.
Once the oil has drained, inspect and clean the oil screen and spring assembly if your model uses this type of filter system. Reinstall the drain components carefully and do not overtighten aluminum threads.
Add the correct amount of oil specified by the owner's manual. Check the level using the correct dipstick procedure for your model and inspect for leaks after running the engine briefly.
|
|
|
6. Gearbox Oil Change
|
|
Warm the engine and place the scooter securely on the center stand. Position an oil catch container underneath the gearbox drain area.
Remove the drain plug and allow the old fluid to drain completely. Reinstall the drain plug carefully without overtightening.
Using a funnel, add the correct gear oil through the fill opening until the fluid reaches the appropriate level specified for your model.
 |
|
|
7. Install & Adjust the Mirrors
|
|
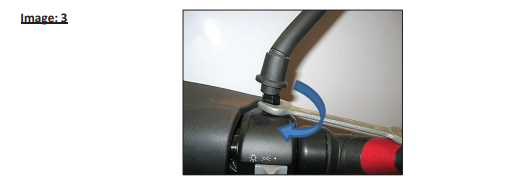
Install the left and right mirrors and tighten them securely with the appropriate wrench. Be careful not to scratch the bodywork.
Slide the rubber decorative grommet into place and adjust both mirrors so you have the best possible view behind the scooter.
|
|
|
8. Check the Tires
|
|
Inspect the tires for damage and make sure they hold air properly. Check the valve stem and valve core to make sure they are secure.
Inflate the tires according to the pressure specified on the tire sidewall or in your owner's manual. Always use the correct cold inflation pressure for your specific scooter.
Do not exceed the maximum cold tire pressure listed on the tire sidewall.
|
|
|
FINAL INSPECTION
Almost Ready To Ride
Double-check that everything is installed correctly, all required fasteners are secure, fluids are at the proper levels, and all components are ready before operating your scooter.
FINAL CHECKLIST
✓ Wheels and axle secure
✓ Brakes operating correctly
✓ Battery installed correctly
✓ Oil and gearbox fluid checked
✓ Tires properly inflated
✓ Mirrors installed and adjusted
✓ Controls and wiring checked
✓ Body panels securely installed
✓ No loose hardware or visible leaks
If you are unsure about any part of the assembly or inspection process, please have a qualified mechanic inspect the scooter before riding.
|
|